Jackrabbit gives you options when you want to make a sale from your store. You can post the fees to the family's account or accept immediate payments at the time of sale for store item(s).
Make a Sale/Post Fees
There are multiple ways to make a sale in Jackrabbit: from the Module (menu) > Store, directly in a Family record, or in an All Families grid.
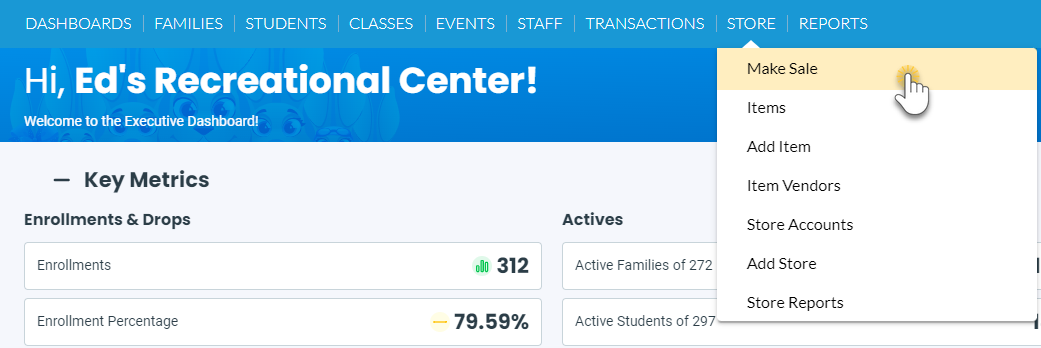
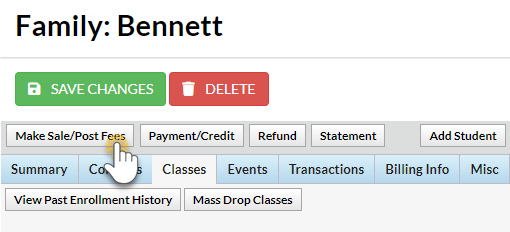
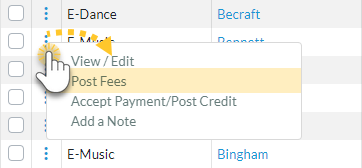
- Go to the Store (menu) > Make Sale or alternatively, open a family record and click the Make Sale/Post Fees button or click on a family row menu (Post Fees) in the Families (menu) > All Families. Regardless of the access point, you start from, the procedure is the same.
From the
Store Menu
This option allows you to choose a family or store.
From a
Family Record
This option allows you to complete a transaction for a specific family.
From All Families-
Row Menu
This option allows you to post a sale from a family row menu.
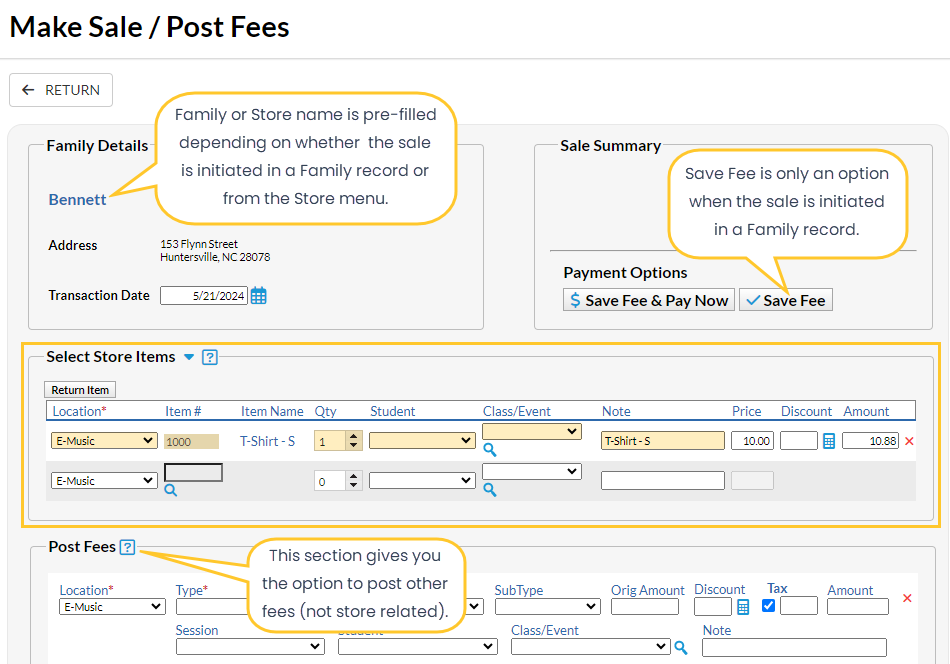
- Select a Store or Family.
- Store - When you initiate your sale from the Store (menu) > Make Sale, the default store information is automatically added to the Store Details section. If you have multiple stores the default is set to the first store that was added to Jackrabbit, as identified by the Store ID that was created for it at that time. The Store ID is located on the Summary tab of the Store record, on the bottom right. See Add Additional Store Accounts for more information.
- Family - When you initiate your sale from a Family record > Make Sale/Post Fees button, or a Family row menu, the family's information is automatically added to the Family Details section.
Note: If the sale is for a different store or family, start typing into the Store/Family Search field. Jackrabbit will search for matches after the first letter is typed. A list of matches displays and the correct one can be selected. All Store accounts are listed with 'Store:' in front of the name to differentiate between stores and families. Stores show at the top of the list. To assist in finding the correct family, each account displays the store/family name and billing contact’s name and address.

- Select Store Items. Enter the item number manually or use a barcode scanner. The item's price and details will appear on the transaction line when the item is selected. New rows are added automatically.
- Select the Quantity (Qty). Use the up/down arrows to select the correct quantity. Once an item is selected the predetermined price will populate and the Discount and Amount fields become activated.
Note: The tax is totaled in the Sale Summary section (top right). - Select Student, Class/Event, and add a Note if applicable.
- Add a Discount for the store item or click on the calculator icon.
- The calculator icon opens up a Discount window where you can enter the discount amount, discount percentage or click on a Quick Discount button. The Quick discount buttons will calculate the correct amount.
- Go to the
Gear (icon) > Settings > General > Drop-down List Editor (left menu) > Transaction > Quick Discount to add up to 4 discount amounts.
- Add fees in the Post Fees section (bottom) that are not store-related when applicable.
- Click on Save Fee & Pay Now or Save Fee to complete the transaction and move to payment options on the Payment Transaction Entry page.
- Save Fee will only display when you initiate a sale from a Family record.
- Save Fee & Pay Now button is visible if the transaction is for a Store account.
- After clicking on Save Fee & Pay Now, if the family has a prior balance, you'll be asked if the full balance is being paid. If Yes is selected, then the full balance will appear as the payment amount. If No is selected, then only the amount of the transactions just entered will be the payment amount.
If you don’t see the Payment Transaction Entry page after clicking a payment button, check your pop-up blocker and allow the pop-up.
Payment Options
You'll notice multiple payment options for store merchandise: cash, check, credit cards, and any other payment methods you accept for your business. The payment method drop-down list is created under the Gear (icon) > Settings > General > Drop-down List Editor (left menu) > Transaction > Payment Method.
Use Card/Acct on File - This will process the payment amount using the credit card/bank draft information on file (Family's Billing Info tab). This button is inactive for store accounts because they do not have credit cards on file.
Use New Card/Acct on File - Opens a pop-up window to enter the customer's credit card information.
When using a Family account, an option is offered to save the credit card information (if no card is currently on file) or replace the existing credit card (if a card is already on file).
If the Family Billing Contact has an email address, the email receipt confirmation is automatically sent to this email address unless the Do Not Send box is checked. To email confirmation to another email address, enter the email address(es) in the space provided.
Use Terminal Payment - This option is ONLY available when you have an EMV Card Terminal set up for your business. The card can be swiped with a card swipe reader or the credit card information can be manually entered. When using the Store account, the card is processed for this transaction ONLY. No credit card information is saved.
Print a Receipt
On the Payment Transaction Entry page, check the Receipt box. The receipt lists all fees related to the payment. e-Commerce payments include the approval code, transaction id code, and last 4 digits of the card number. Payment notes also appear on the receipt.
Receipts that are emailed with credit card transactions only include the total amount of the transaction.
A sample cash receipt is shown below. You have the option to Print or Email the receipt from this window.

Frequently Asked Questions
Q. Does the Store interface with a Cash Drawer?
A. No, Jackrabbit does not interface with a cash drawer. You should print Deposit Slips each day to reconcile the contents of the cash drawer.


