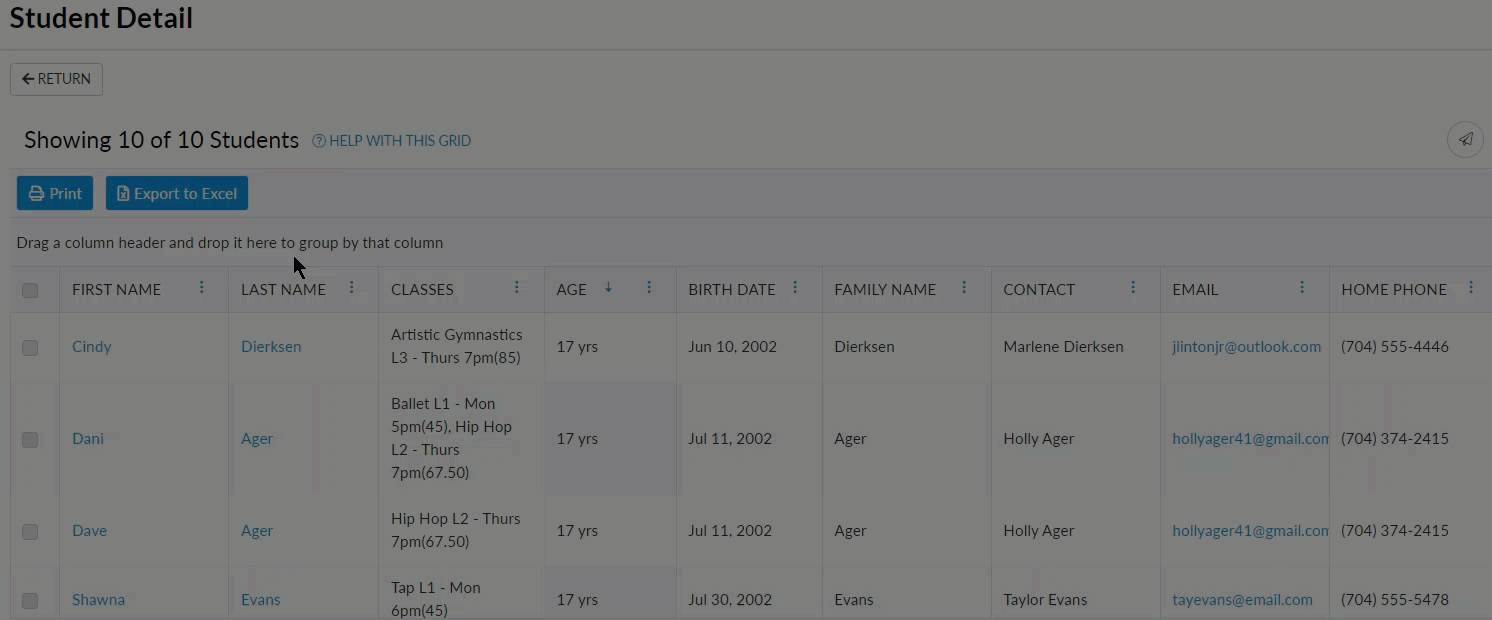
Throughout Jackrabbit, you will see grids, which are sometimes referred to as tables. These grids display the data you have entered into Jackrabbit; they are incredibly robust - allowing you to group, sort, filter for specific information, and more. Note: the features available in each grid throughout Jackrabbit may vary.
Sample Grid

| 1 | Breadcrumbs display the currently selected filters.
|
| 2 | Drag and drop a column header into the grouping bar to group results.
|
| 3 | Click a row menu to open action options for that row.
|
| 4 | Page number displays up to 250 items per page.
|
| 5 | When a column filter is applied, the column menu is highlighted in blue.
|
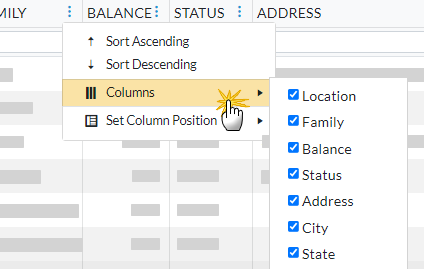
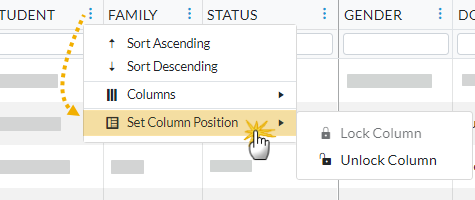
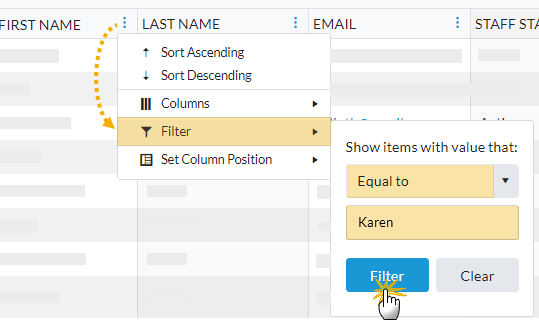
| 6 | Column menu offers options to sort, display, and filter the data within the column (options in this menu vary depending on the grid).
|
| 7
|
Manage Certifications opens the Drop-down List Editor to edit (for the Certifications page only).
|
| 8
|
Adjust columns, Send Message, Refresh Grid, Add New icon (action icons available will vary between grids), More (varies by grid).
|
| 9
|
Slider shows more columns in the grid.
|
Group Your Data
Drag and drop column headers to the grouping bar to create groups within your report.
- Click on the column title in the grouping bar to re-sort the column in ascending or descending order.
- When multiple columns are added to the grouping bar, the first column on the left is the first level of grouping. The second column added to the grouping bar will group the rows within the first column, etc.
- Click and drag the column headers left or right within the grouping bar to change the order.
- Use the X in the column header to clear a column from the grouping bar.
Sort and Filter Data in the Grid
There are multiple ways you can sort and filter data in a grid. Select the options that work best for you:
|
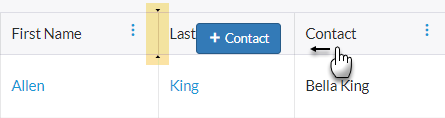
You can reorder the columns in a grid by clicking and dragging them to the spots you want them in. Double arrowheads indicate where the column will drop (behind the arrowheads). |
 |
|
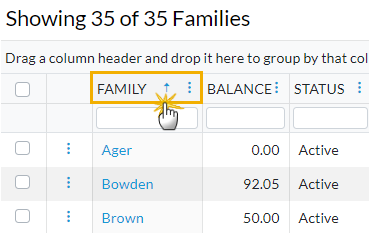
Click on the column header to sort in ascending or descending order. An arrow displays to show the current sorting order; no arrow indicates that no sorting has been done on the column. |
 |
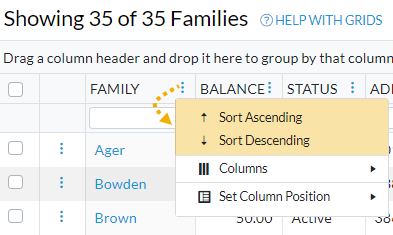
Use the column menu to access the sorting options for each column.
|
 |
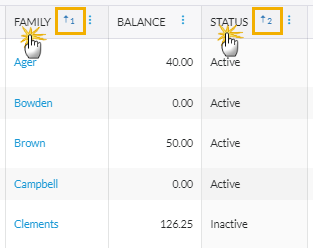
Multi-sort columns in the grid, for example:
|
 |
|
 |
|
 |
|
 |
Take Action
Each grid is designed to provide ease of use and to simplify different actions you may want to take. Work with an individual record (e.g., a specific family), or apply an action to several records at once (mass action).
Action Icons
![]()
Located on the right-hand side of the grid, the action icons available will vary between grids.
 |
Click the Adjust columns icon to squeeze or expand the columns in the grid. Squeeze grid allows you to see all the columns on the page, Expand grid makes the columns wider and you may have to use the slider (bottom right) to horizontally scroll, depending on the number of columns in the grid. Either view can be saved as default or favorite view. |
 |
Send a Message - Choose to send an email, push notification, or text message to chosen recipients in the selected records, e.g., Primary Contacts only, or Primary, Billing, and Other Contacts.
|
| Use the Refresh Grid icon to reload the data in the grid after making a change. | |
 |
Click the Add New icon to open a pop-up window to add new data. This icon is visible depending on which grid you are viewing, for example, on the Staff Certifications page Add New Certificate window opens or on the All Families page an Add New Family window opens. If any rows are selected in the grid, an Add New icon will not be visible. |
|
Use the More icon to access actions that can be taken with one or more records at once. The options available will differ between grids, e.g., in All Families, you can update Family Fixed Fees, Family Discounts, Clear UDF Answers, and more. In All Students, you can update Student Fixed Fees, Add a Note, and more.
Print and Export functions (where available) are accessed from the More icon. Depending on how you have customized the grid, printing may take some setting adjustments. Check out this short video tutorial Print from Grids in Jackrabbit for tips. |
Row Actions
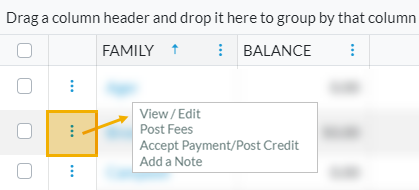
Click on the Row Menu to access actions that can be taken with the record in that row. The row actions offered will vary between the different grids in Jackrabbit and may include:
- View/Edit - click on the link to open the content in the row and make changes.
- Delete - remove a row from that grid.
- Add a Note - add a note to the record.
- Additional actions - click on the row menu to see the other action options.
If any checkboxes are selected in the first column of a grid, the row menus are deactivated and are no longer visible.
Data Visuals
Some of the grids in Jackrabbit have visual elements, referred to as data visuals. Click on the sections of the visual to see the information populate in the grid results.
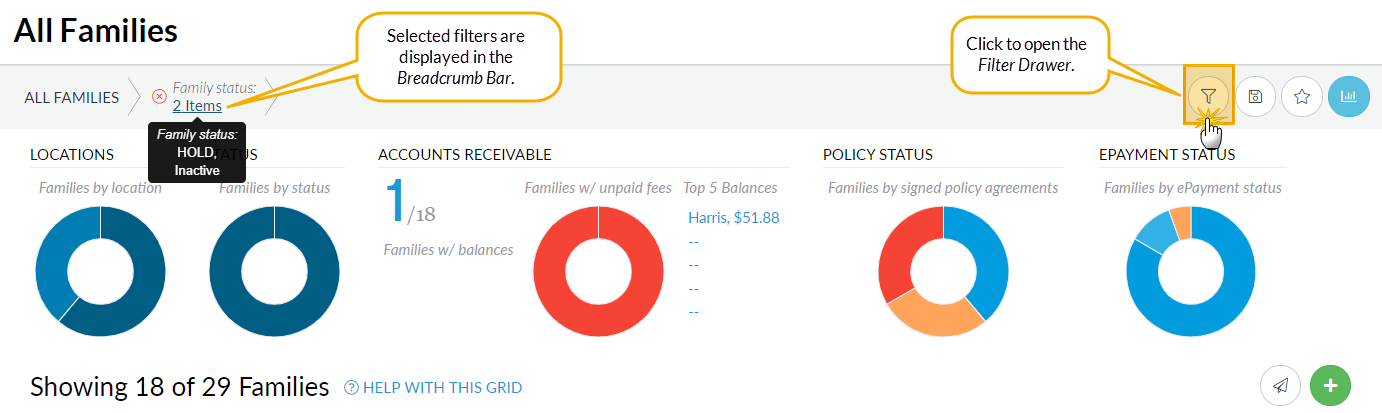
In addition, there is a filter drawer to make additional selections that narrow down results in the grid. Within the filter drawer, the criteria are organized into sections. Use the search field at the top of the drawer to locate specific criteria and be taken directly to the matching filter. Use the Expand All link to open all sections or the arrow next to each section header to open individual sections. Click the Apply button to filter the data in your grid using the criteria you selected; these filters will display in the breadcrumb bar.
- Save your filtered data as a Favorite. Once filters are selected, click the Save as favorite (icon)
 , enter a favorite name, choose if you want to make the favorite a default view, and decide if you want to share with your team. Your filtered data, column width, column locked positions are all saved. Click Save.
 - Load a Favorite by clicking on the Favorites (icon)
 , select your saved favorite from the drop-down list, and click Load. The grid populates the data and the breadcrumbs indicate the selected filters.
Refer to Work with All Families - View, Search, and Take Action, Work with All Students - View, Search, and Take Action, and Work with All Classes - View, Search, and Take Action for more details on the All Families, All Students, and ALL Classes data visuals.