Use this report to generate statements to fit your organization's needs. This may include using the Search Criteria to print statements by Enrollment Status and by Category 1, 2, or 3 as needed.
Note: Select one or more Categories, Students, Transaction Types, and Sub-types by holding down the CTRL key.
- Go to the Families menu > Family Reports > Statements-Print.
- Use the Family/Account Search Criteria to select the families whose statements you want to print. If you leave all the criteria blank, you will generate a report with statements for all currently enrolled families, or you can narrow down the selection:
- Select a specific Family/Account with the option to select individual or multiple students when you check off Print Statement by Student(s) and select the students from the drop-down list.
- Select Families Enrolled in Class (search for a specific class).
- Select Families Enrolled with Instructor (select an instructor from the drop-down list).
- Use the Transaction Search section to narrow down the types and dates of transactions you want to be displayed on the statement.
- Use the Format Options section to create the 'look' of the statement by selecting which family and transaction information to include. The logo, header, and footer settings are also customized here.
Tip: If you regularly use the same Statement Header and /or Footer, you can create defaults in the Gear icon > Settings > General > Statements (left menu). If you need to change the default for one set of statements only, you can edit the header/footer while on the Statements - Print screen. - Click Submit.
- Statements will be created based on the settings you've chosen and opened in PDF format so that they can be printed on 8 1/2 x 11 paper.
- Printed statements fit into a #10 window (business size) envelope for mailing.
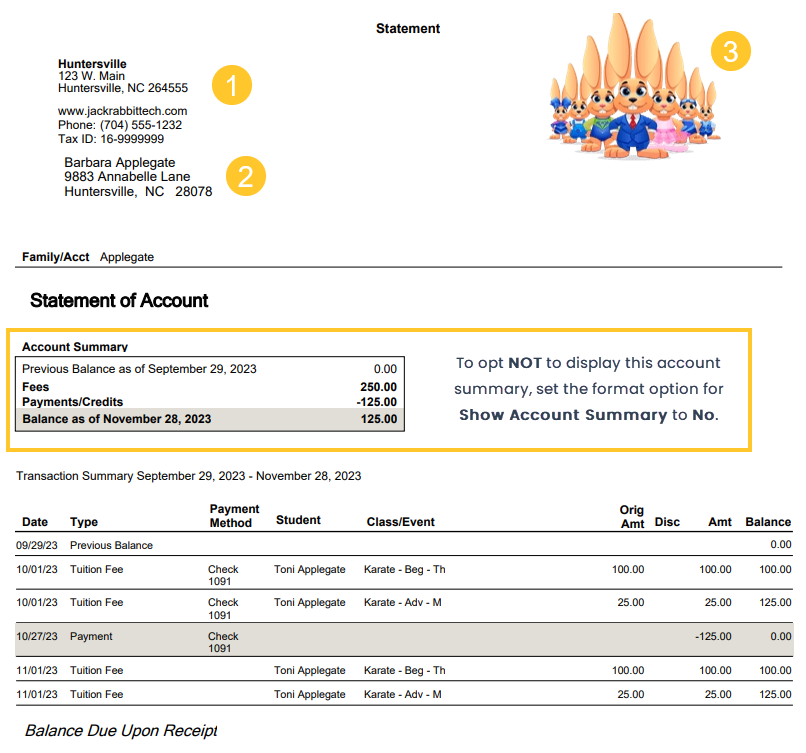

| 1 | Return address is set by going to the Gear menu > Account > My Account > Organizational Details. |
| 2 | The family email address is taken from the contact who has Billing Contact set to Yes. |
| 3 | Organization logo can be added from the Gear menu > Settings > General > Organization Logo (left menu). |
Frequently Asked Questions
Q. We have multiple Business Locations and the business address on our statement/invoice is not correct. How can I fix this?
A. To ensure that the specific Location address displays on the statement/invoice, add a specific Location address under the Gear icon > Settings > General > Business Locations (left menu). Click +Add Location to add a new Location. Or click the pencil icon to bring up the Edit Location window and update as needed.
If a Location does not have a specific address, Jackrabbit uses the main address set found under the Gear menu > Settings > General > Organization Defaults.
Q. Printed labels for mailing statements/invoices are not printing correctly. How can I fix this?
A. If your labels are not aligning, you may need to adjust the page handling options. The options vary between PDF readers. You may need to set "Page Scaling = None," use "Custom Scale = 100%", or turn off "Fit Page."
Q. How do I show the current balance on a statement/invoice?
A. Set Show Current Balance to Yes (under Format Options > Family and Transaction Information) to display the family/account current balance on the statement.
Q. Why isn't there a tax column on my statement?
A. This is a setting in the Gear icon > Settings > General > Statements (left menu) > Print and Email. You'll want to make sure that Show Tax on Statement is set to Yes and Save Changes.
Time Saver! Save your settings for frequently used statement settings. See Favorites - Save your Report Criteria Selections for instructions.