Jackrabbit offers you multiple ways to send emails and student schedules to your students and families. Note: Email Families & Email/Print Student Schedules from the Families category must be selected as the user permission in order to use this functionality. To learn how to update User permissions, see Manage User IDs.
Email Students
Depending on why you are sending the email and which students you want to communicate with, select from one of the following options:
- Email students from Families (menu) > All Families, or Students (menu) > All Students
- Email students in all or selected classes from the Classes menu > All Classes.
- Email students in a single class from the Classes menu > All Classes.
Email Students from All Families or All Students
- Select which menu you prefer to use to send the email.
- Go to the Families menu > All Families (filter the grid as needed).
- Go to the Students menu > All Students (filter the grid as needed).
- Select the checkbox in the 1st column for the students you want to include in the email. To select all students in the grid, leave the checkboxes in the 1st column blank.
- Click the Send a Message icon
 and select Email from the drop-down menu.
 - Define your audience in the pop-up window (deselect all the recipients with the exception of Students).
- Click Next: Add'l Settings.
- Complete the Additional Settings and click Next: Composer to open the Message Classes page.
- Select a Template if desired and the email Type (plain text or HTML).
- Enter an Email Subject Line and Message.
- We recommend you compose your email message in the Jackrabbit email editor. If you copy/paste from another application (i.e., Microsoft Word), there may be hidden code that will affect how your email appears to your intended recipient.
- Click Attach File, Insert Image, or Choose from Dropbox to attach files and add images if needed. See the Help Article Email Attachments and Images for more details.
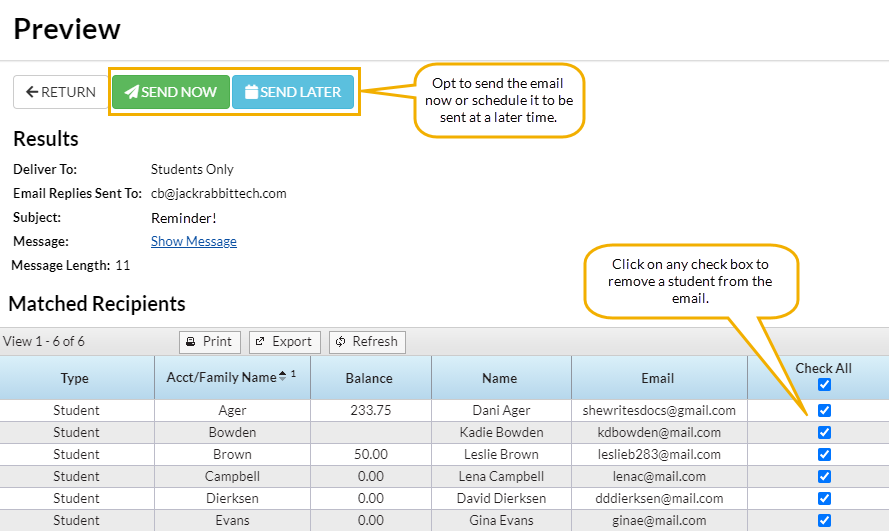
- Click Preview List.

- Clear the checkbox for any students you want to omit. You can clear the Check All header checkbox to remove every email address and select only specific students.
- Click Send Now to send the email right away or select Send Later to schedule the email to be sent later. See our Help article Schedule an Email for more information.

Email Students in All or Selected Classes from the Classes (menu) > All Classes
- Go to the Classes menu > All Classes.
- Select the checkbox in the 1st column for the classes you want to include. To select all classes in the grid, leave the checkboxes in the 1st column blank.
- Only students with email addresses on their student record will be sent an email.
- Click the Send a Message icon and select Email from the drop-down menu.
- Leave only the Students selected in the Define Audience pop-up window and click Next: Add'l Settings.
- Complete the Additional Settings and click Next: Composer to open the Message Classes page.
- Select a Template if desired and the email Type (plain text or HTML).
- Enter an Email Subject Line and Message.
- We recommend you compose your email message in the Jackrabbit email editor. If you copy/paste from another application (ie. Microsoft Word), there may be hidden code that will affect the way your email appears to your intended recipient.
- Click Attach File, Insert Image, or Choose from Dropbox to attach files and add images if needed. See the Help Article Email Attachments and Images for more details.
- Click Preview List.
- Clear the checkbox for any students you want to omit. You can clear the Check All header checkbox to remove every email address and select only specific students.
- Click Send Now to send the email right away or select Send Later to schedule the email to be sent later. See our Help article Schedule an Email for more information.

Email Students in a Single Class from the Classes (menu) > All Classes
- Go to the Classes menu > All Classes.
- Click the row menu
 for the class and select Email/Text Class to open the Email/Text Class page. The class name and current enrollment are displayed.
 - Select a Template, if desired, and the email Type (plain text or HTML).
- Enter an Email Subject Line and Message.
- We recommend you compose your email message in the Jackrabbit email editor. If you copy/paste from another application (i.e., Microsoft Word), there may be hidden code that will affect how your email appears to your intended recipient.
- Click Attach File, Insert Image, or Choose from Dropbox to attach files and add images if needed. See the Help Article Email Attachments and Images for more details.
- Using the Search Criteria, add additional students to the email.
- Select who to Send Message To. You can send to Contacts, Students and Staff, Contacts and Students, Contacts and Staff, Contacts Only, Students Only, or Staff Only.
- Change the drop-down to Yes if you would like to Include Opt Out Emails.
- Select a reply email address from Email Replies Sent To, which includes the email addresses of all User IDs and Locations in your system. Note: The main email address in Organization Defaults is also sent a copy of the email.
- Click Preview List.
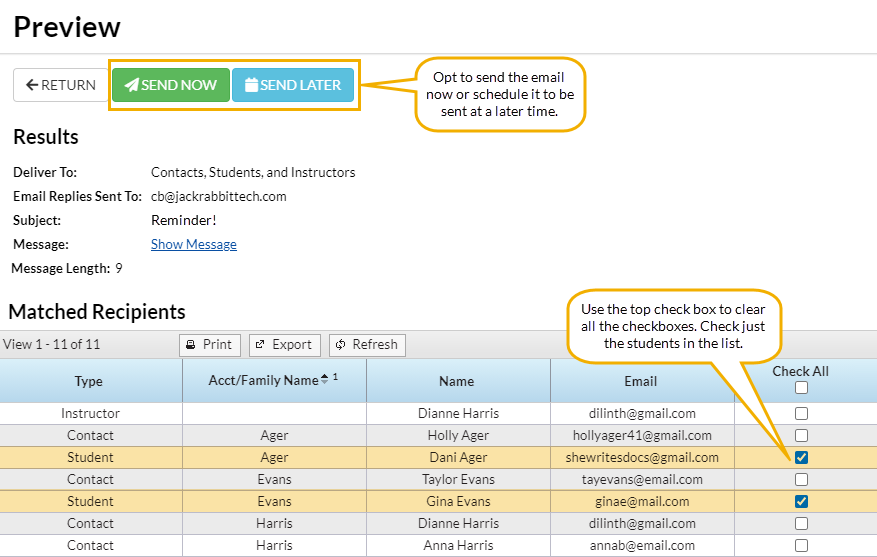
- Clear the Check All header checkbox and select only the students from the class. If you leave all the checkboxes selected, emails will be sent to all contacts for the class, including students, contacts, and instructors.
- Click Send Now to send the email right away or select Send Later to schedule the email to be sent at a later time. See our Help article Schedule an Email for more information.
 for the class and select Email/Text Class to open the Email/Text Class page. The class name and current enrollment are displayed.
In addition to emailing students, you can also print their schedules as needed from the Students menu > Students Schedules > Print. Refer to Email/Print Student Schedules for additional information.