Save valuable time by scheduling ePayments to process automatically for multiple families with Jackrabbit’s Automated ePayments!
Overview
The automation of ePayment processing starts with the Process ePayments feature (Transactions menu > Process ePayments). Automation tasks are created when Process Later is selected on the Process ePayments page in the Process Setting section.
The scheduled ePayment tasks define when the ePayment processing will start, and for recurring tasks, how often they will run and when they will end. An optional email reminder can be sent to give you the heads up that a batch of ePayments will be processed soon, allowing you to make any necessary changes before processing. Scheduled tasks are managed (view, edit, pause, delete) from the Task Management page.
The Details
The first step in automating ePayments is to create a task to schedule the processing.
- Go to Transactions (menu) > Process ePayments.
- Choose Process Later in the Process Setting section.
- Enter the date and time you want this task to first run as the Schedule Start. Note: Don't schedule ePayments to process too close to your Gateway Settlement Time to allow time to address any concerns prior to payments settling.
- Select the criteria and the unpaid fees you want to schedule to process at a later date. Learn more about the Process ePayments criteria and settings. TIP: If you want to exclude a family when using Process ePayments (Transactions menu), select the Omit Family from Transactions > Process ePayments setting on the Billing Info tab of their Family record.
- Click the Preview ePayments button to review the families and amounts that would be processed that day based on your criteria choices. Note: The exact families and amounts on the Preview ePayments page meet your chosen criteria and settings on the day the preview was generated and may change before the scheduled processing date.
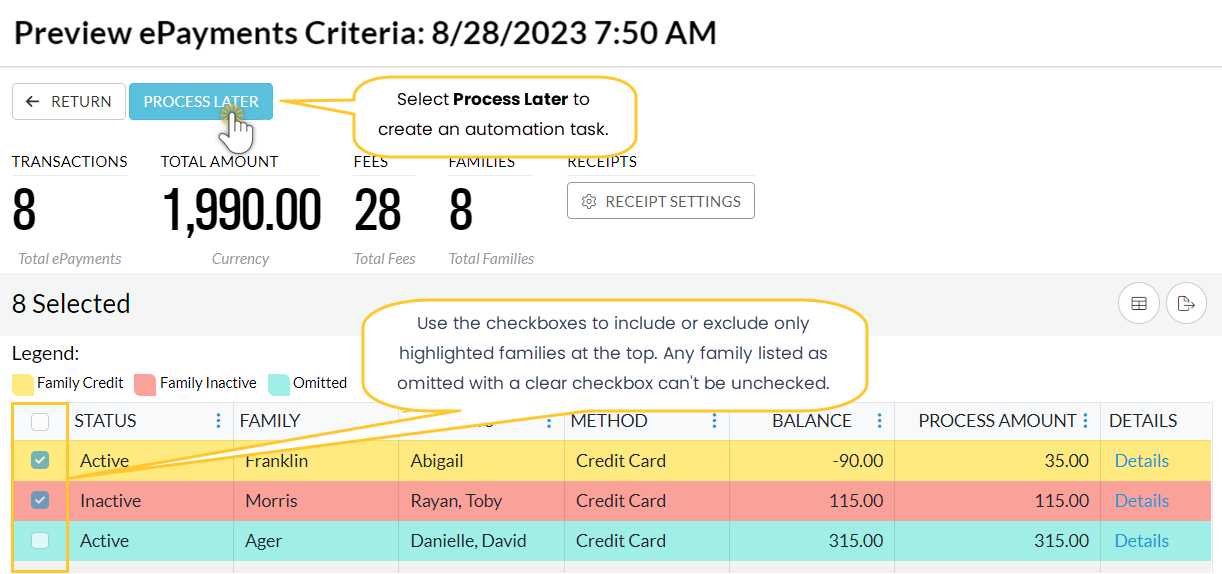
- Select Process Later to go directly to the task scheduler and skip the Preview.
- Complete the details for the task, then click Next.

Name - Give the task a descriptive name. This name appears in the Task column of the Task Management page.
Schedule Starts - This date will default to the date and time chosen with the Process Setting. You can change it here if you have a preferred start date and time.
Recurrence - From the Repeats drop-down, select an option to define how often and when the task will run. The day of the week, date, and time are based on the Schedule Starts date above. Use the Custom option to change how often the posting repeats. Instead of daily/weekly/monthly, you can post at a different interval, for example, every 2nd week or every 3 months.
Ends On - Define when the task should end. The task end date is inclusive, i.e., any tasks scheduled to run on the end date will run.
- Never - the task will run indefinitely
- On a specific date - select a date with the Calendar icon.
- After a specified number of occurrences
- Choose whether or not you want to send an email reminder to your organization's email address. If you want to send a reminder, specify the number of days in advance it should be sent. Click Save.
- A confirmation window advises that your task has been created and displays the details. Click Close.
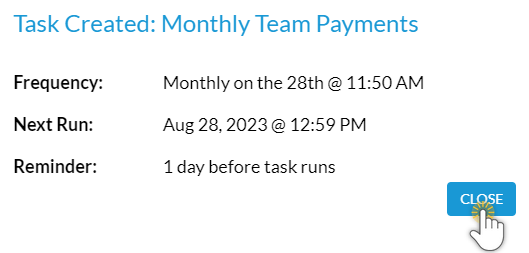
- A confirmation window advises that your task has been created and displays the details. Click Close.


When you close the confirmation window, you are taken to the Task Management page, where you can view, edit, pause, or delete a scheduled task. Learn more about Automation Task Management.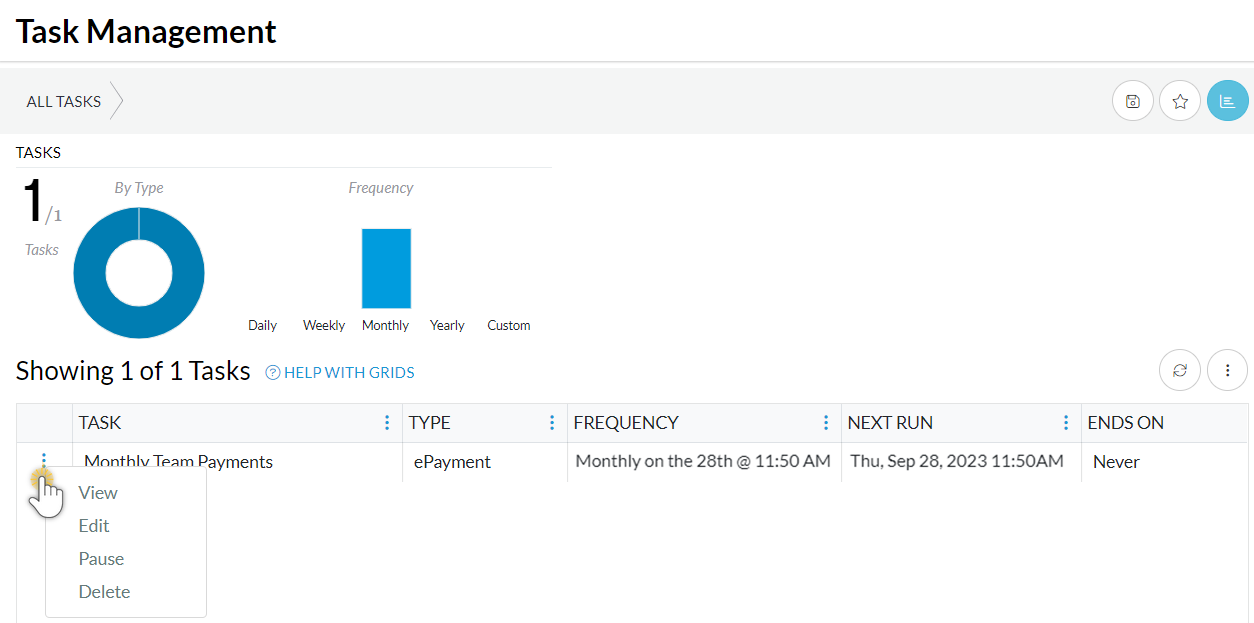
Check your Time & Date Settings, including the Daylight Saving dates, to ensure ePayments are scheduled correctly. Go to the Gear icon > Settings > General > Organization Defaults.