Waitlists help manage class demand efficiently and ensure fairness for your students. They can also boost participation rates, minimize no-shows, and optimize resource allocation.
- Get instant alerts on the Executive Dashboard when classes have openings so you can fill spots quickly.
- Prioritize your waitlist based on enrollment status, skill level, date added, and more.
- Plan for the future; class waitlists indicate how popular a class is.
Access Waitlists
The waitlist displays a list of Student cards. Use these cards to reorder the list, view details about students, add notes, and send messages directly from the waitlist.
You can get to the waitlist in several ways:
- Open the Class record, then click the Waitlist tab.
- Click on the class name in a waitlist report (Search Waitlists and Waitlists with Openings).
- Click the Waitlists for Classes with Openings alert on the Executive Dashboard, then click on the class name.
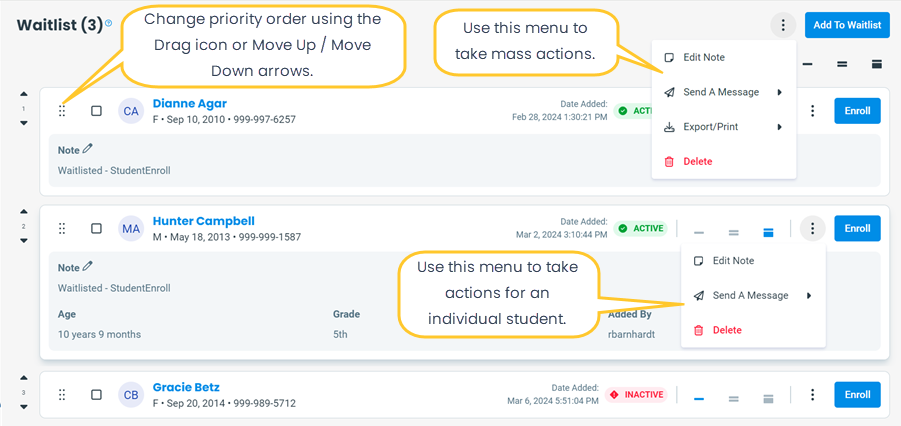
- Change priority order using the Drag icon or Move Up / Move Down icons.
- Use the More Options menu at the top of the waitlist to take mass actions.
- Use the More Options menu on a Student card to take actions for a single student.
- Compact View, Comfortable View, and Spacious View icons
 toggle the amount of information displayed on Student cards.
Add an Existing Student to a Waitlist
To add an existing student to the waitlist:
- From the Class record > Waitlist tab, click the Add To Waitlist button.
- Search for students:
- To filter the results, enter a first and/or last name and click Search.
- To view all students, leave the search fields blank and click Search.
- Click the Waitlist link next to the student's name. A green success message will appear for each student added.

Add a student to the waitlist by accident? Click Undo in the green success message to remove the student that was just added.
Waitlist Through Online Registration
You can allow waitlist signups through your Online Registration form.
- When you enable waitlisting through Online Registration, classes that are full display a Waitlist link instead of a Register link.
- The Allow Waitlist When Class Full setting is controlled through the Online Registration settings.
- When a parent or student clicks the Waitlist link on your organization's Class Listing Table, the student is added to the waitlist.
- Use the Max Wait setting on the Class record > Summary tab to set the limit for the number of students allowed on the waitlist.
Prioritize Students on a Waitlist
Priority order impacts the order in which students are displayed on the waitlist and is also listed in the Search Waitlists report.
When students are added to the waitlist, they are initially added in date order. However, you can manually reorder the waitlist to align with your specific priorities, such as enrollment status, skill level, or other considerations.
There are two ways to change the priority order of students on the waitlist:
- Click the Move Up / Move Down arrows to move a Student card.
- Click and hold the Drag icon on a Student card, then just drag and drop.
The new order of the list will be automatically saved.
Changes like adding, deleting, and changing student priority on the waitlist are logged in User Activity.
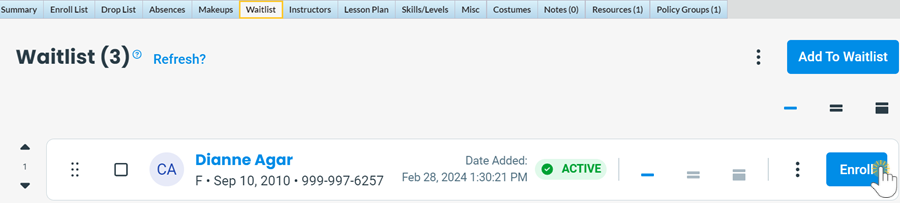
Enroll Students From the Waitlist
Enrollment from the waitlist is not automatic. When there is an opening, staff should navigate to the waitlist and enroll a student.
Click Enroll to open the Enrollment Details window where you can enroll the student.
- Optionally change Enroll Type to Waitlist to add visibility into the enrollment source.
- Enroll Date defaults to today's date. Update this as needed.
- For full classes, you have the option to leave the student on the waitlist or enroll them.
When you enroll a student from the waitlist, they are removed from the waitlist.
Tip: Use the Waitlists for Classes with Openings alert on the Executive Dashboard to keep track of when an opening becomes available.
Delete a Student from a Waitlist
From the Class record > Waitlist tab, click the More Options icon in the Student card and select Delete.
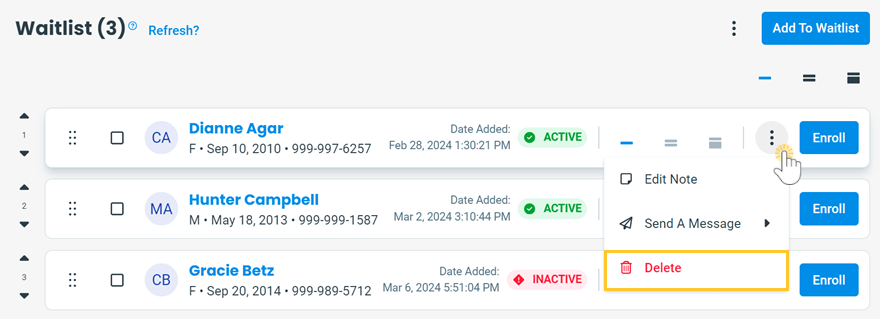
Deleting a student cannot be undone. Use the Add To Waitlist button to add a deleted student back to the waitlist.
Message Waitlisted Students (Email, Text, or Push)
You can send a message to multiple students at once or to an individual student.
Send Mass Messages
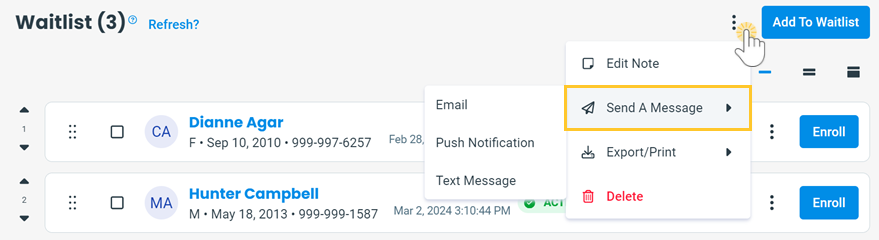
You can send a message to multiple students at once. To send a mass message from the waitlist:
- From the Class record > Waitlist tab, choose recipients:
- Select checkboxes to choose specific students to message.
- Clear all checkboxes to message all students.
- Click the More Options icon at the top of the waitlist.
- Click Send A Message, then select a message type
(Email, Text Message, or Push Notification).
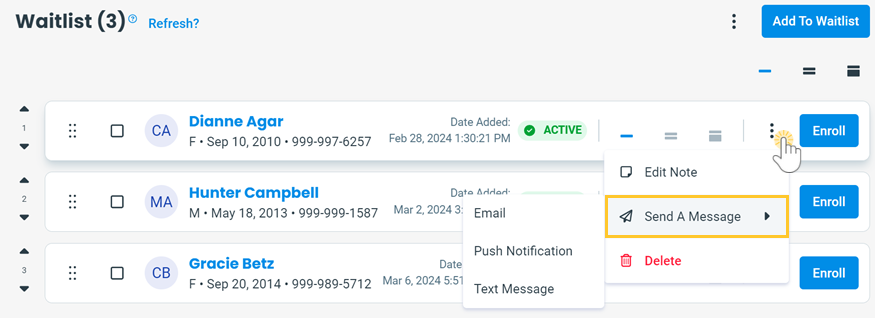
Send Individual Message
You can send a message to a single student directly from the Student card on the waitlist:
- From the Class record > Waitlist tab, click the More Options icon on the Student card.
- Click Send A Message, then select a message type
(Email, Text Message, or Push Notification).
Waitlist Visibility
Jackrabbit offers multiple ways to access information on your waitlists quickly and easily.
Executive Dashboard Alert for Openings in Classes with a Waitlist
Use the Waitlists for Classes with Openings alert on the Executive Dashboard to be informed when any class with a waitlist has openings.

- The alert displays the total number of openings in all classes with waitlists. Click the alert to view details.
Waitlist Reporting
Jackrabbit offers several reports that display information about waitlists.
| Search Waitlists report | Classes (menu) > Class Reports > Search Waitlists displays a list of students on waitlists. Note: If a student is on the waitlist for multiple classes, they will appear in a separate row for each class. |
| Waitlists with Openings report | Classes (menu) > Class Reports > Waitlists with Openings lists classes with waitlists and available openings. |
| User Activity report | Reports (menu) > Find Reports > All Reports (left menu) > Search User Activity displays user activity, including certain changes made to waitlists. |
Waitlist Data Visual
The Classes with Waitlists data visual lets you quickly see information about classes with waitlists and drill down for more details.
Go to Classes (menu) > All Classes and scroll to the right to view the Classes with Waitlists data visual.

- Click the blue number to display classes with waitlists in the grid.
- Click any bar chart section to drill down to classes with a certain number of students on the waitlist.
Frequently Asked Questions
Q. How do I add a new student to a waitlist?
A. To add a new student to a waitlist, first add the student to Jackrabbit. Then, add them to the waitlist. New students can also sign up for waitlists online if you allow it.